A dirty EV charging connector can slow your charge rate, trigger connection errors, or even cause overheating at the pins. Most EV owners never think about cleaning it until something goes wrong. A quick clean every one to three months keeps your charging system reliable and helps you avoid costly repairs.
Quick Answer
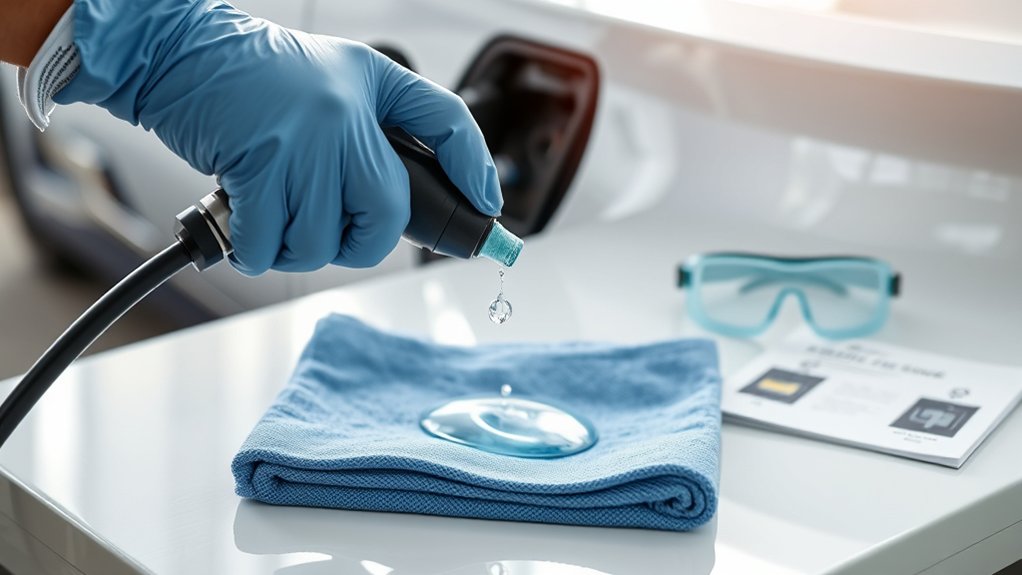
Turn off your vehicle and unplug the charger first. Use a foam swab or Q-tip moistened with 91% isopropyl alcohol to gently clean the charge pins. Blow out loose debris with compressed air, wipe the exterior with a pH-neutral cleaner on a microfiber cloth, and let everything air dry fully before plugging back in.
Key Takeaways
- Always power off your vehicle and unplug the charger before you start cleaning.
- Use 91% isopropyl alcohol on a foam swab for the charge pins; never spray liquid directly into the port.
- Compressed air removes loose debris safely from both the vehicle port and the connector.
- Let the port air dry for at least 15 to 30 minutes before reconnecting to prevent moisture damage.
- Clean your connector every one to three months at home, or monthly if you regularly use public chargers.
What’s in This Article
- Essential Safety Precautions Before Cleaning Your EV Connector
- How to Clean Your EV Charging Connector: A Step-by-Step Guide
- Inspecting for Dirt and Corrosion in the Charging Port
- Best Practices for Cleaning Your EV Charging Pins
- How to Keep Your Charging Cable and Connector Clean
- Common Mistakes to Avoid When Cleaning EV Connectors
- Why Regular EV Charging Maintenance Matters
- How to Troubleshoot Charging Issues Caused by Dirt
- Community Tips and Resources for EV Maintenance
- What to Do After Cleaning Your EV Connector
- Frequently Asked Questions
Essential Safety Precautions Before Cleaning Your EV Connector
Before you start cleaning your EV charging connector, you need to prioritize safety. Turn the vehicle off and disconnect the charger completely to prevent electrical shock.
Warning: Never clean an energized connector. Touching live electrical contacts poses a serious shock hazard and can cause permanent damage to the charging system.
Keep high-pressure water and aggressive cleaning methods away from the connector. Moisture that gets into the electrical components can cause malfunctions and accelerate corrosion.
Choose a pH-neutral cleaning solution made for automotive use. It protects sensitive surfaces and contacts without leaving harmful residue. Wear protective gloves to protect your hands from chemicals and to stop skin oils from contaminating the connector pins.
How to Clean Your EV Charging Connector: A Step-by-Step Guide
Time required: 10–15 minutes
What You’ll Need
- 91% isopropyl alcohol (or higher concentration)
- Foam swabs or Q-tips
- Can of compressed air
- Microfiber cloth
- pH-neutral all-purpose cleaner
- Protective gloves
- Flashlight
With your supplies ready, follow these steps to clean your EV charging connector safely and effectively.
- Power off and disconnect. Turn off your vehicle and unplug the charger from both the vehicle and the power source. This removes all electrical hazards before you touch anything.
- Blow out loose debris. Point the compressed air nozzle at the charging port and the connector. Use short bursts to push out dust, grit, and loose particles. Pay close attention to the pin contacts and any crevices where dirt collects.
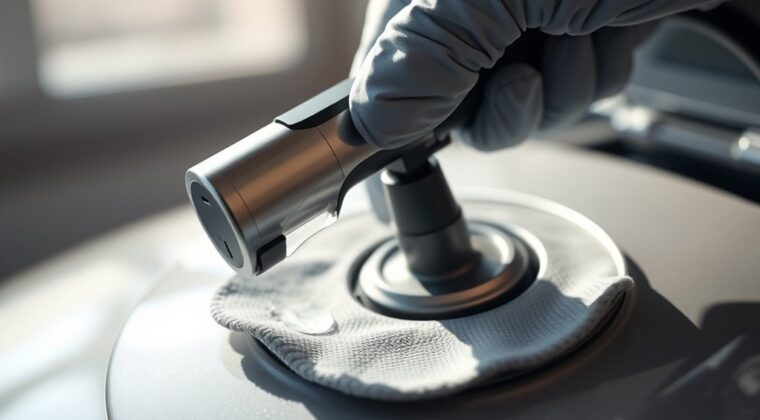
- Clean the charge pins. Dip a foam swab or Q-tip into 91% isopropyl alcohol. Gently wipe each charge pin, paying special attention to the top two AC pins and the two large DC pins at the bottom. Use light, controlled strokes. Do not force the swab past the pins.
- Wipe down the exterior. Apply a pH-neutral all-purpose cleaner to a microfiber cloth. Wipe the outer surfaces of both the connector and the port housing. Do not spray cleaner directly into the port.
- Inspect with a flashlight. Look inside the port for any remaining debris, cotton fragments, or signs of corrosion. Remove anything you find before moving on.
- Air dry completely. Let the port and connector air dry for at least 15 to 30 minutes. Do not reconnect until all moisture has evaporated.
Inspecting for Dirt and Corrosion in the Charging Port
Regular inspections of your EV charging port keep it running at peak efficiency. Catching problems early prevents charging slowdowns and connector damage.
Regularly inspecting your EV charging port ensures optimal performance and charging efficiency by preventing dirt and corrosion buildup.
Each time you inspect, look for these specific warning signs:
- Visible dirt or dust: Even light buildup can impede the electrical connection.
- Rubber seals: Check for cracks or wear that might let contaminants into the port.
- Charge pins: Use a flashlight to check each pin for corrosion or stuck debris.
- Border channel: Keep this area clear of accumulated dirt and grime.
- Corrosion buildup: Oxidation on the pins increases electrical resistance and causes power loss during charging.
Taking five minutes to run through this checklist saves you from bigger problems later.
Best Practices for Cleaning Your EV Charging Pins
The charge pins are the most sensitive part of the connector. Handle them with care to avoid bending or scratching the contacts.
Start with a Q-tip lightly moistened with 91% isopropyl alcohol. Clean the top two AC pins and the larger DC pins with gentle strokes. Avoid any aggressive force that could bend or scratch the pins.
Pro tip: After cleaning, check the swab for cotton fragments and remove any that remain in the port with a dry swab. Loose cotton near hot electrical contacts poses a fire risk.
For stubborn debris removal, use a dry Q-tip or foam swab instead of applying more liquid. Keep liquids out of the port itself. Dirty pins cause poor connections and overheating during charging, so check them as part of every cleaning session.
Finish with a final flashlight inspection before you plug the charger back in.
How to Keep Your Charging Cable and Connector Clean
Your charging cable picks up road grime, moisture, and hand oils every time you use it. Keeping it clean protects both the cable and your vehicle’s port.
- Inspect the cable and connector before each use for visible dirt, debris, or corrosion.
- Wipe the exterior with a soft, non-abrasive cloth after each session to stop moisture from reaching the electrical components.
- Clean the metal contacts with a small amount of isopropyl alcohol on a foam swab when you do your regular connector clean.
- Never use harsh chemicals or abrasive pads — they scratch contact surfaces and degrade performance over time.
- Store the cable in a dry, clean spot. Use protective caps on both connector ends to block dust and moisture when not in use.
Common Mistakes to Avoid When Cleaning EV Connectors
A few common errors can turn a simple cleaning job into an expensive repair. Avoid these pitfalls:
Keep water and high-pressure sprays away from the connector. Moisture seeps into electrical components and causes shorts and corrosion.
Warning: Never use WD-40, household cleaning products, or petroleum-based sprays on your connector. These leave residue that attracts dirt, degrades insulation, and can interfere with the electrical connection.
Skip abrasive scrubbing tools. Stiff brushes and rough pads scratch sensitive contact surfaces and create the poor connectivity you’re trying to prevent.
Always unplug and power down before cleaning. Working on a live connector risks electrical shock and can damage the system.
Dry the connector and port completely after cleaning. Skipping this step leads to moisture-driven corrosion that reduces performance over time.
Why Regular EV Charging Maintenance Matters
Regular maintenance of your EV charging equipment prevents charging failures and keeps your system running efficiently. Dirty or corroded connectors reduce charge speed, cause incomplete sessions, and can lead to overheating.
Preventing Charging Issues
A neglected EV charging connector leads to real problems: incomplete charging sessions, reduced battery efficiency, and error messages on your dashboard. Preventive cleaning stops these issues before they start.
Here’s what a regular cleaning routine achieves:
- Reduces resistance: Removing dirt and debris keeps the electrical connection clean and efficient.
- Maintains charge speed: Clean contacts ensure a consistent charge current during every session.
- Catches damage early: Regular inspections reveal bent pins or worn seals before they cause a failure.
- Counters environmental factors: Salt air, dust, and public charger residue accelerate corrosion. Cleaning offsets that wear.
- Builds a routine: A scheduled clean every one to three months, or monthly for public charger users, takes under 15 minutes and prevents costly repairs.
Extending Equipment Lifespan
Dirt on cables and connectors causes electrical resistance to climb, which generates heat and accelerates wear. Regular cleaning prevents that cycle from starting.
Periodic inspections let you spot wear and tear early, so you can fix small problems before they require expensive parts or professional service. Clean connectors reduce the risk of incomplete charging sessions and failure-to-connect errors.
Specialized cleaning kits designed for EV charging contacts help maintain precise electrical contact, which holds charge speed steady over time. Building connector care into your routine vehicle maintenance extends the life of your charging equipment and keeps your EV charging experience reliable.
How to Troubleshoot Charging Issues Caused by Dirt
Dirt and debris raise electrical resistance inside the connector, which cuts charge current and causes sessions to stall or end early. When you notice slower-than-normal charging or error messages on your dashboard, check the connector and port for buildup first.
Follow these steps to diagnose and fix dirt-related charging problems:
- Inspect the charge port and connector for visible dirt, corrosion, or debris.
- Use compressed air to blow out any loose contaminants from both ends.
- Clean the contacts with a foam swab and isopropyl alcohol.
- Try a charging session and note whether speed or reliability improves.
- If problems persist after cleaning, consult a certified EV technician. Deeper electrical faults, damaged pins, or worn internal components need professional diagnosis.
Community Tips and Resources for EV Maintenance
EV owners who share maintenance tips in online communities have refined some practical approaches to connector care. Drawing on that collective experience can save you time and help you avoid mistakes.
Community Sharing Best Practices
Online EV owner communities have developed a body of connector maintenance knowledge that goes beyond manufacturer manuals. Here are some widely shared approaches:
- Use specialized cleaning kits designed for EV charging contacts for the most thorough maintenance.
- Join online EV owner groups for product recommendations specific to your vehicle and connector type.
- Invest in precision foam swabs rather than standard cotton-tip applicators to reduce fragment risk.
- Inspect connectors for dirt and corrosion after every trip to a public charging station.
- Try straw-style cleaning brushes for hard-to-reach areas inside the connector housing.
Local Resource Recommendations
EV owner groups often share practical buying guides for maintenance tools. Products like Mister-EV and Jaycar brushes come up frequently as useful for charging connectors.
Community members across various online forums recommend DeoxIT D5S-6 contact cleaner for stubborn oxidation, as it evaporates cleanly without leaving residue that attracts dirt. Online EV communities offer insights and tips from real-world users with hands-on experience. Local hardware stores often carry reusable straw cleaning brushes that work well for small probe sockets.
Connecting with other EV owners, whether locally or through online groups, surfaces practical maintenance approaches you won’t find in a service manual.
What to Do After Cleaning Your EV Connector
After cleaning, let the connector and port sit for at least 15 to 30 minutes so all solvents and moisture evaporate completely. Reconnecting too soon traps moisture inside and accelerates corrosion.
After cleaning your EV connector, wait at least 15 to 30 minutes for moisture to evaporate fully before reconnecting for optimal safety and performance.
Inspect the port and connector one more time for debris or cotton fragments that could block the connection. Then follow these final steps:
- In humid climates, apply a small amount of dielectric grease to the rubber seals around the port — not to the metal pins or electrical contacts.
- Check the rubber seals around the charging flap for cracks or wear.
- Confirm the seals are clean and seated correctly to block contaminants from entering the port.
- Store the connector in a clean, dry location when not in use.
- Fit protective caps over both connector ends to block dust and moisture exposure.
Frequently Asked Questions
How do you clean an EV charger connector?
Power off your vehicle and unplug the charger completely before you start. Use a foam swab or Q-tip moistened with 91% isopropyl alcohol to clean each charge pin with gentle strokes. Blow out loose debris with short bursts of compressed air, wipe the exterior housing with a pH-neutral cleaner on a microfiber cloth, and let everything air dry for at least 15 minutes before reconnecting.
Can you use WD-40 to clean a charging port?
No. WD-40 is a petroleum-based water dispersant that leaves a sticky residue as it dries. That residue attracts dirt, degrades the connector’s insulating materials, and interferes with the electrical connection. Stick with 91% or higher isopropyl alcohol, which evaporates completely and leaves no residue behind.
How do you safely clean out a charging port?
Start with compressed air to remove loose particles, then use a foam swab with a small amount of 91% isopropyl alcohol to clean the pin contacts. Work gently and avoid forcing the swab past pins. Inspect the rubber seals for wear, and never spray any liquid directly into the port opening. Let the port dry fully before using it.
Can you put rubbing alcohol directly in your charging port?
Never pour or spray rubbing alcohol directly into the charging port. Apply it to a foam swab first, then use the swab to clean each pin individually. Excess liquid inside the port can reach components that shouldn’t get wet and may cause corrosion or electrical damage even after drying.
Your EV’s charging connector handles hundreds of plug cycles every year. A quick clean every one to three months, or monthly if you rely on public chargers, takes under 15 minutes and keeps every session running at full speed. Check your connector the next time you charge, and set a reminder so the habit sticks.
References
- Detailing Electric Vehicle Charging Port and Surroundings Safely — Killer Brands Detailing, 2025
- Best Way to Clean EV Charging Port and Connector — HiRide, 2026
- How Often Does My EV Charger Need Maintenance? — Qmerit, 2026
