Yes, a weather shield can help protect your home EV charger from rain, splash water, snow, UV exposure, and debris, especially around the plug, connector, cable end, and holster. It should never replace a properly listed outdoor EV charger, correct wiring, safe grounding, or local code compliance. For the safest setup, use outdoor-rated charging equipment, keep the connector clean and dry, mount the charger in a sheltered spot, and inspect the cable before each session.
Quick Answer
You do not always need an EV charger weather shield if your charger is listed for outdoor use, but adding one can reduce direct rain, snow, sun, and connector wear. Use it as extra protection, not as a substitute for an outdoor-rated EVSE, proper installation, GFCI protection, and manufacturer-approved cable storage.
Key Takeaways
- A weather shield is useful for reducing splash, UV exposure, snow buildup, and connector corrosion, but it does not make an indoor charger safe outdoors.
- Choose a charger that is listed for outdoor use and has a suitable IP or NEMA enclosure rating for your location.
- Do not block airflow, trap condensation, seal the connector airtight, or modify the charger enclosure.
- Use a holster, dock, hook, or reel so the plug and cable stay off wet ground.
- Stop charging and call a qualified electrician if you see melted plastic, scorch marks, repeated breaker trips, damaged cable insulation, or moisture inside a receptacle or charger housing.
At a Glance
| Time Required | 10 to 30 minutes for a simple removable shield; longer if a licensed electrician must add or correct outdoor electrical protection. |
| Difficulty | Easy for a non-electrical rain cover; professional-only for wiring, breaker, receptacle, conduit, or EVSE enclosure changes. |
| Tools Needed | Plastic shield or outdoor-rated cover, ruler, marker, drill, smooth-edge cutting tool, suction cups or hooks, cable holster, lint-free cloth. |
| Cost | About $10 to $50 for a basic removable shield or connector cover; more for a listed enclosure, surge protection, or electrical upgrades. |
Warning: Do not modify your EV charger, breaker, receptacle, plug, conduit, or charger enclosure unless you are qualified to do that work. Outdoor EV charging equipment should follow the charger manual, local permits, local electrical code, and DOE home charging guidance. Hire a licensed electrician for Level 2 wiring, hardwired chargers, new circuits, GFCI issues, surge protection, or any sign of heat damage.
Do You Need an EV Charger Rain Shield?
You may not need an EV charger rain shield if your charger is already listed for outdoor use and installed in a protected location. The U.S. Department of Energy notes that outdoor EV charging can be safe, even in rain, when the equipment is rated for outdoor installation. A shield still adds value because it reduces direct water, UV exposure, snow buildup, and dirt around the parts you touch most often.
Think of the shield as a wear-reduction accessory, not the main safety system. Your main protection comes from the charger’s listing, weather rating, grounding, GFCI protection where required, correct circuit sizing, sealed conduit, and manufacturer instructions.
A shield helps most when your charger sits on an exposed wall, near wind-driven rain, under a shallow overhang, or in a driveway where the connector gets splashed. It can also help if your cable holster faces upward or if the plug end collects droplets after storms.
Note: “Weatherproof” is not enough by itself. Look for a real outdoor listing, a recognized certification mark, and a clear enclosure rating in the charger manual or label.
Can You Charge an EV in the Rain?
Yes, you can usually charge an EV in the rain when you use outdoor-rated charging equipment as directed by the vehicle and charger manufacturers. EV charging connectors are designed so power is controlled through the vehicle and EVSE communication system, not by exposed live pins sitting open in the rain.
That does not mean you should ignore water. Before you plug in, check the connector face, pins, cable, holster, and vehicle charge port. If you see standing water, grit, corrosion, cracked plastic, damaged insulation, or a loose connection, dry the area and inspect it before charging.
Never plug in if the connector has been submerged, the receptacle or charger housing is wet inside, the cable jacket is cut, or the breaker trips repeatedly. Those are not normal rain problems. They are warning signs that need professional inspection.
Choose the Best Spot for Your Charger
Place your EV charger in a sheltered location, such as a garage, carport, covered side wall, or under a deep overhang. This cuts direct exposure to rain, wind, sun, falling debris, and snow. It also makes daily charging easier because you spend less time wiping the connector before each session.
Avoid low-lying spots where water collects after storms. Pooling moisture can reach the cable, plug, wall box, or receptacle and create corrosion or nuisance faults. Mount the charger high enough to stay above splash zones, but still low enough for safe cable handling.
Keep the unit away from tight corners where the cable bends sharply. Also avoid high-traffic paths where vehicles, bikes, lawn tools, or foot traffic can hit the wall box or pull on the cord.
Natural barriers like walls, fences, or dense landscaping can reduce wind-driven rain, but do not bury the charger behind plants. Airflow matters, and you still need clear access for inspection, emergency shutoff, and service.
Weather Shield vs Weather-Rated Charger
A weather-rated EV charger is the safety foundation. A weather shield is only an added barrier. If a charger is rated for indoor use only, a shield does not make it safe for outdoor installation.
Choose charging equipment that is listed or certified by a nationally recognized testing laboratory. ENERGY STAR EV charger guidance warns that not every charger sold online or in stores is safety certified, so do not rely on price, brand claims, or a vague “waterproof” label alone.
You should also confirm that the charger’s weather rating fits your location. A covered garage wall has different exposure than a coastal driveway, open fence post, or snowy driveway.
| Protection Layer | What It Does | What It Does Not Do |
| Outdoor-rated EVSE | Provides tested enclosure protection when installed as directed. | Does not prevent all wear, dirt, cable abuse, or storm damage. |
| Weather shield | Reduces direct rain, snow, sun, and splash on the plug area. | Does not replace listing, grounding, GFCI protection, or correct wiring. |
| Cable holster or dock | Keeps the connector off the ground and angled away from water. | Does not protect a damaged plug or wet receptacle. |
Pick a Weather-Rated Charger and Cover
Choose a charger rated for outdoor use, such as a unit with a suitable IP rating or NEMA enclosure rating. Common outdoor EVSE ratings may include IP65, NEMA 3R, NEMA 4, or NEMA 4X, depending on the product and exposure. Always follow the charger manual rather than assuming one rating fits every climate.
Add a weatherproof cover, connector dock, or small roof-style shield if direct rain or sun hits the plug area. The cover should shed water away from the charging connector and cable. It should not trap heat, block status lights, press buttons, bend the cable, or seal moisture inside.
If possible, mount the unit under an overhang or in another sheltered exterior location to reduce direct exposure and improve long-term reliability.
Weather-Rated Charger Specs
A weather-rated EV charger should clearly show a rating in the manual or on the product label. An IP65 rating means the enclosure is dust-tight and protected against water jets under the standard test conditions described by the IEC 60529 IP code. NEMA enclosure ratings are different and are often used in North America.
Do not treat IP and NEMA ratings as exact one-for-one matches. They come from different systems and test different details. For a home charger, the practical question is simple: does the manufacturer list the product for your installation location and exposure?
- For a covered garage or carport, a lower outdoor exposure rating may be enough if the manual allows it.
- For direct rain, snow, or wind-driven weather, choose a stronger outdoor rating and a better mounting location.
- For coastal air, road salt, or harsh sun, look for corrosion-resistant materials and inspect more often.
Protective Cover Choices
When you choose a cover, match it to the risk you are trying to solve. A small connector cover helps with splash and dust. A wall-mounted hood helps with rain and sun. A larger outdoor enclosure may protect a plug-in receptacle area, but it must be rated for the electrical setup and installed correctly.
Your cover should be rigid, UV-resistant, smooth-edged, and easy to remove for inspection. It should also allow air to move so condensation does not build up inside. Avoid soft plastic bags, tape, sealed wraps, or anything that can melt, hold water, or press against electrical contacts.
Pro Tip: A good cover sheds water downward and away from the plug. If water runs toward the connector, receptacle, cable entry, or vehicle charge port, the cover angle is wrong.
Exterior Installation Tips
Before you mount a home EV charger outside, confirm three things: the charger is listed for outdoor use, your electrical circuit is sized for the charger, and the installation follows local code and the charger manual. Level 2 chargers often require a dedicated 240V circuit, and many homes need a panel capacity check before installation.
For plug-in EVSE, use the exact receptacle type and mounting orientation required by the manufacturer. For hardwired EVSE, the conduit, fittings, and seals must be suitable for the location. Do not drill into the charger case, add unapproved holes, or route cable through a homemade opening.
- Keep the charger reachable from the parking spot without stretching the cable.
- Keep the cable off the ground with a hook, reel, dock, or holster.
- Keep the charger visible so you can spot status lights, alerts, cracks, or moisture.
- Keep drainage clear below the charger so runoff does not splash back upward.
Protect the Cable, Plug, and Connector
To keep your EV charger cable, plug, and connector in good condition, store them in a dock or holster when they are not in use. Use retractable reels, hooks, or cable loops that prevent sharp bends. This helps protect the cable from abrasion, kinks, driveway grit, and ground contact.
Check the plug and connector before every session for moisture, debris, corrosion, bent pins, loose parts, or visible wear. If you find contamination, clean and dry the connector before charging. Use a clean lint-free cloth. Do not spray cleaners into the connector unless the manufacturer allows it.
| Check | Action |
| Cable | Hang it on a hook or reel so it does not sit in water or rub on concrete. |
| Connector | Use a holster or vented cover that keeps rain out without trapping condensation. |
| Plug end | Store it facing downward or in a dock so water drains away from the contacts. |
| Vehicle port | Check for water, ice, dirt, or damaged seals before plugging in. |
These habits reduce fraying, tripping hazards, corrosion, and charging faults while keeping the system ready for daily use.
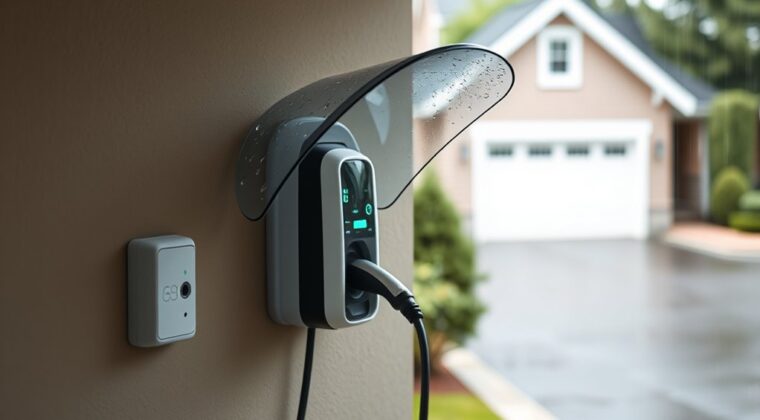
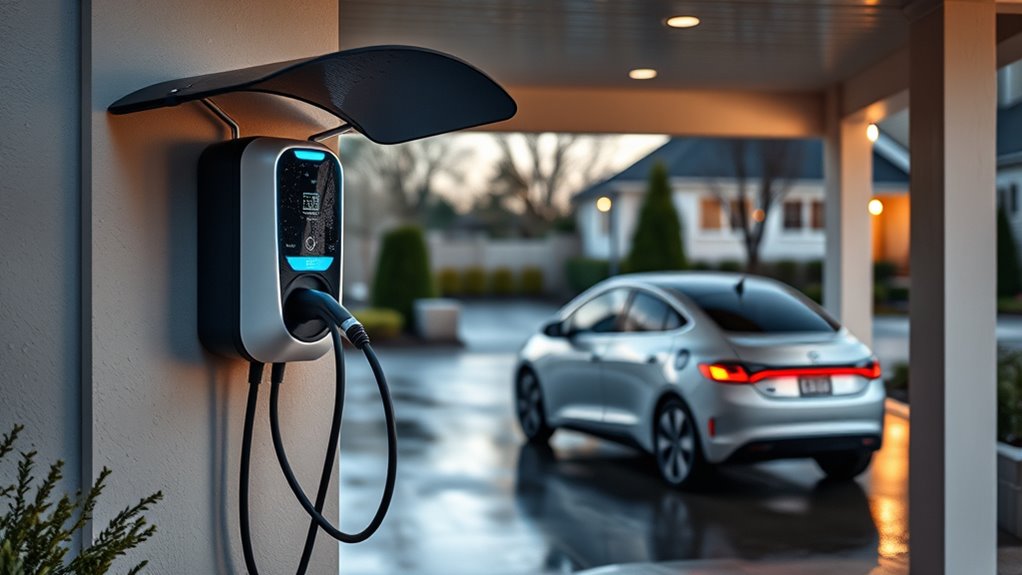
Build a Simple EV Charger Rain Shield
You can build a simple removable rain shield with a small plastic lid, rigid outdoor-rated plastic sheet, or similar lightweight material. The goal is to block falling or wind-driven rain from the connector area while leaving the charger untouched.
Do not attach homemade parts directly to the charger enclosure unless the manufacturer allows it. Use wall hooks, suction cups on a smooth nearby surface, or a separate bracket that does not pierce the EVSE case, cable, conduit, or receptacle cover.
Shield Materials and Tools
Choose lightweight materials that resist moisture and UV exposure. A rigid plastic panel around 30 cm by 50 cm can work for many wall-mounted setups, but size it to your charger, plug location, and cable path.
Basic tools may include a ruler, marker, drill, smooth-edge scissors, utility knife, sandpaper, suction cups, hooks, or stainless fasteners for a separate wall mount. Smooth every cut edge so it does not scrape the cable or your hand.
- Use rigid plastic instead of fabric or bags.
- Add drainage holes near the low edge.
- Add small ventilation gaps so moisture can escape.
- Keep the shield clear of the plug face and latch.
- Remove it for inspection after storms.
Mounting and Drainage
Mount the shield at a slight downward angle so rain runs off instead of pooling over the charging port, plug end, receptacle cover, or cable path. Make sure runoff leaves the area freely and does not drip straight into the holster.
| Feature | Purpose | Result |
| Downward angle | Directs runoff away from the plug area. | Less standing water. |
| Drainage holes | Releases trapped rain. | Lower moisture stress. |
| Ventilation gaps | Lets damp air escape. | Less condensation. |
| Removable mount | Allows cleaning and inspection. | Easier maintenance. |
Connector Drying Tips
After you set the shield at a downward angle, focus on keeping the connector itself dry. Before every session, inspect the plug face, pins, latch, cable end, and vehicle inlet for droplets, grit, road salt, or corrosion.
If you spot moisture, wipe the outside surfaces with a clean lint-free cloth and let the connector air-dry. Never use a heat gun, hair dryer, metal tool, paper clip, or compressed air aimed into electrical contacts. If the connector was submerged, dropped in a puddle, or exposed to floodwater, do not use it until it has been inspected.
- Dry contacts help reduce charging faults.
- Clean storage lowers corrosion risk.
- Fast checks protect the charger, vehicle inlet, and cable.
Guard Against Moisture and Power Surges
Storms can bring two different problems: water exposure and electrical surges. A weather shield helps with the first problem. It does not solve the second. For surge protection, use the charger’s built-in protection if provided, a properly rated whole-home surge protective device, or a circuit-level solution recommended by your electrician and charger manufacturer.
Do not plug a Level 2 EV charger into a common household power strip or consumer surge strip. EV charging is a high-load application and needs equipment rated for the circuit, plug type, environment, and continuous duty.
| Measure | Purpose |
| Outdoor-rated EVSE | Protects the charger housing under the conditions listed by the manufacturer. |
| Sealed conduit and fittings | Helps stop moisture entry and corrosion at wiring paths. |
| Proper GFCI protection | Reduces shock risk where required by code and equipment instructions. |
| Surge protection | Helps limit transient voltage spikes when properly selected and installed. |
After a major storm, inspect the shield, holster, cable, connector, wall box, conduit, and nearby receptacle cover. If anything looks loose, cracked, burned, wet inside, or discolored, stop using the charger until it is checked.
Protect Your Charger From Snow, Ice, and Sun
Rain is not the only outdoor problem. Snow, freezing rain, road salt, heat, and UV exposure can also wear down a charger setup.
In winter, keep snow from piling against the wall box, cable, and connector holster. Brush snow away gently instead of striking the charger. Do not chip ice off the connector with a screwdriver or metal tool. If ice blocks the latch or port, follow the vehicle manual and let the area warm safely.
In hot climates, avoid dark airtight covers that trap heat. Chargers can warm during normal operation, and covers should not block vents, cooling paths, status lights, or emergency access. In coastal or salted-road areas, rinse exterior surfaces only if the manufacturer allows it, then dry the connector storage area and inspect for corrosion more often.
Keep Your EV Charger Working Longer
A well-fitted weather shield can help your EV charger last longer by reducing direct rain, UV exposure, snow, debris, and splash around the connector area. The biggest gains come from combining the shield with a smart installation location, proper cable storage, and routine inspection.
Use this simple maintenance rhythm:
- Before each charge: check the connector, cable, vehicle port, and plug face for water, dirt, or visible damage.
- Weekly: wipe dust and debris from the holster, shield, and cable loop.
- Monthly: inspect the shield for cracks, warped edges, loose mounts, and blocked drainage holes.
- After storms: check for water inside receptacle covers, loose conduit, tripped breakers, or damaged seals.
- Every season: confirm the charger still sits securely and that the cable has no sharp bends or worn spots.
Do not keep using a charger that smells hot, shows scorch marks, trips repeatedly, has a cracked connector, or charges only when the cable is held in a certain position. Those signs point to a fault, not normal weather wear.
When Not to Use a Weather Shield
A weather shield is not always the right fix. Skip it or change the design if it creates a new hazard.
- Do not use a shield that traps heat around the charger.
- Do not use a shield that blocks drainage or holds water against the wall.
- Do not use a shield that pushes on the plug, latch, cable, or vehicle inlet.
- Do not use plastic bags, tape wraps, or airtight covers around live charging hardware.
- Do not drill into the charger enclosure or listed receptacle cover.
- Do not cover warning labels, status lights, QR codes, or access panels needed for service.
If the only way to keep the charger dry is to seal it inside a homemade box, the location or equipment is probably wrong. Use a listed enclosure or have the installation reviewed by a qualified electrician.
Frequently Asked Questions
How do you protect an EV charger from snow?
Use an outdoor-rated charger, mount it under an overhang or carport when possible, and add a sloped cover that sheds snow away from the connector. Keep the cable off the ground, clear snow gently, and avoid using metal tools to chip ice from the plug or vehicle port.
What is the 80/20 rule for EV charging?
The 80/20 rule means many EV owners charge to about 80% for daily driving and avoid dropping the battery very low when they do not need to. It is battery-care guidance, not a weather-shield rule. Always follow your vehicle manual because battery recommendations vary by model and battery chemistry.
How do you protect a home EV charger outdoors?
Use a listed outdoor-rated charger, mount it in a sheltered location, keep the connector in a holster, manage the cable so it stays off wet ground, and inspect it before charging. Add a weather shield only if it does not block airflow, trap moisture, or modify the charger.
Should you use a surge protector when charging an EV?
You should not use an ordinary power strip or household surge strip for EV charging. For surge protection, use a charger with built-in protection or ask a licensed electrician about a properly rated whole-home or circuit-level surge protective device that matches your EVSE and local code.
Can a weather shield make an indoor EV charger safe outside?
No. A weather shield cannot turn an indoor-only charger into outdoor equipment. Outdoor EVSE must be listed and rated for outdoor use. If your charger is indoor-only, replace it with a suitable outdoor-rated model instead of trying to cover it.
Is IP65 enough for an outdoor EV charger?
IP65 is a strong weather-resistance rating for many outdoor conditions because it covers dust-tight construction and protection against water jets under standard test conditions. Still, you should follow the charger manual and local requirements. Some products use NEMA ratings instead of IP ratings.
Conclusion
A weather shield is a smart extra layer for many outdoor home EV chargers. It can keep rain, snow, sun, splash water, and debris away from the connector area, which helps reduce corrosion and daily wear. It should not replace outdoor-rated equipment, safe installation, proper cable storage, GFCI protection where required, or routine inspection.
For the best setup, choose a listed outdoor EV charger, place it in a sheltered location, store the cable in a holster, keep the plug dry, and use a shield that drains well without trapping heat or moisture. If you see damage, repeated breaker trips, scorch marks, or water inside electrical parts, stop charging and get the system checked before using it again.
Sources
- U.S. Department of Energy Alternative Fuels Data Center: Charging Electric Vehicles at Home — supports outdoor-rated equipment, safe rain charging, code compliance, permits, and qualified installation guidance.
- ENERGY STAR: Electric Vehicle Chargers — supports charger safety certification, Level 1/Level 2 charging guidance, and certified EVSE buying advice.
- OSHA: Nationally Recognized Testing Laboratory Program — supports the meaning of NRTL testing and certification marks.
- NEMA / ANSI-IEC 60529: Degrees of Protection Provided by Enclosures — supports IP rating definitions such as dust and water ingress protection.
- NFPA 70: National Electrical Code — supports using applicable electrical code requirements for EV charging installations.
